How to build a custom fabric covered headboard
I recently luckily came across a wonderful blog called "Design Sponge" and there was a video posted on how to create your own custom fabric headboard.
This is her finished product:
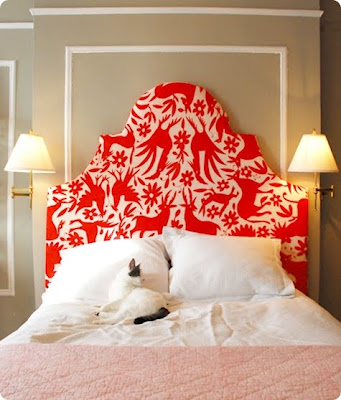
The headboard she created was perfect for what I was envisioning for Libby's room.
Though the tutorial was GREAT for how to apply the foam/fabric, etc., it didn't say anything about actually constructing the board itself. I decided that I wasn't going to spend the extra $ for a contractor to do something I could do myself. That's not to say that it's perfect but I had fun doing it and learned a lot along the way.
So here's how to go from this:

To this:

You'll need a circular saw, jig saw, handsaw (maybe), utility knife (box knife), MDF board, high density foam, quilt batting, and flat joint plates.

And don't forget to wear your safety googles:

Notice the glisten of sweat on my skin. I'm doing this working in our garage in 108 degree heat!

I based the shape of my headboard on the template found HERE and just adjusted the measurements as needed to fit the dimensions I wanted.
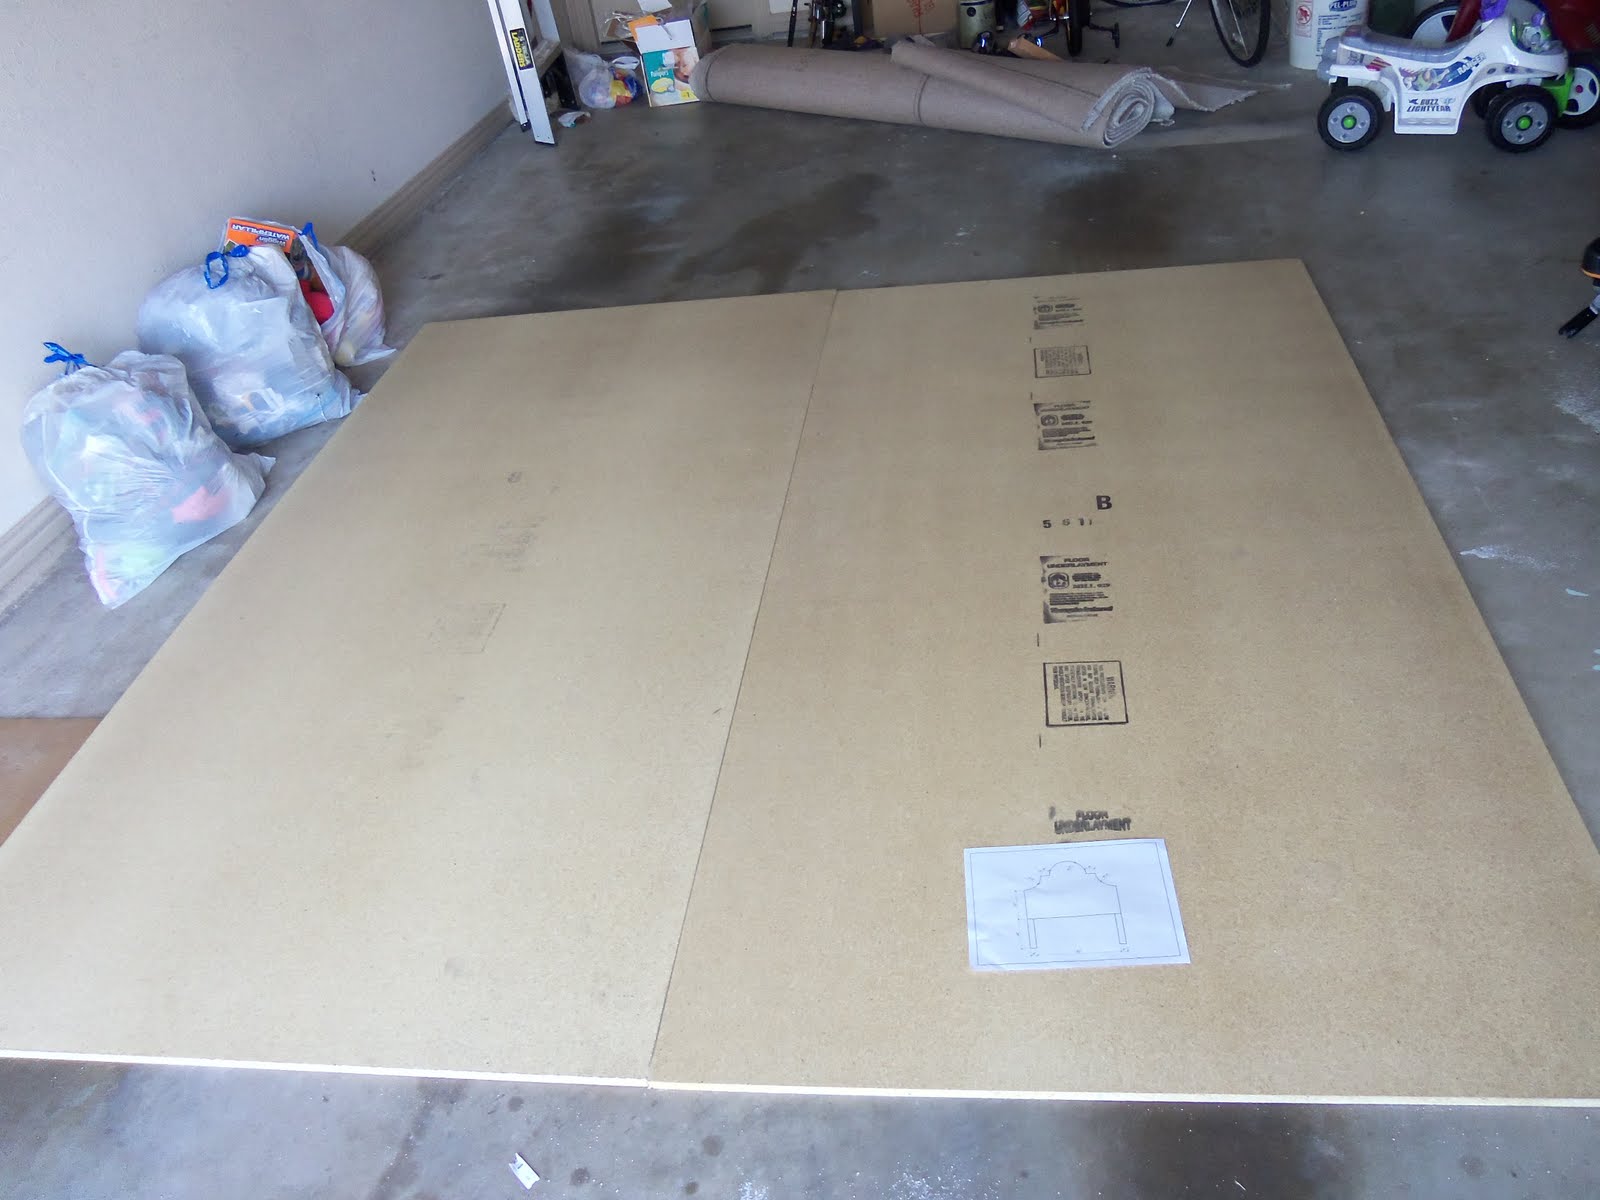
Once I got everything calculated I used a sharpie to draw the outline onto the MDF board:

Because my headboard was going to be super tall I needed to use 2 boards of MDF (~2 inches thick) so I had to use metal joints to fuse the seam b/w the 2 boards. I screwed in 4 plates on each side of the headboard in opposing spaces to make sure that it wouldn't bend at the middle:

After I cut out the shape of the board and screwed in the plates I then followed the tutorial found on the site mentioned above to apply the fabrication to the board. I ordered 2 inch thick high density foam online that was 52 inches wide and 108 inches long. I had to use 2 rolls to cover the board. Total cost for the foam was around $50.00. The fabric I had on hand. I bought it for $6.49 a year ago at a fabric store on sale! The quilt batting is $7.00/bag and I used 2 bags. The MDF board is around $27.00/board and I used 2 boards. The metal plates are $2.25 each bag and I bought 2 bags.

Because the MDF is very easy to break you have to be VERY careful when you're moving the headboard. I found this out AFTER I broke off both legs. Luckily I had already applied the fabric and batting so they were just dangling there. I just quickly cut some pieces of wood and screwed them into the MDF to give the legs support.

The headboard isn't meant to stand on it's own. You hang it with a long metal hanger thingy that you will see on the tutorial on Design Sponge. It worked out great and I measured it so that it looks as though the headboard is free standing.
I'll post more photos of the finished product once I get Libby's room looking the way I envision it in my head.
This is her finished product:

The headboard she created was perfect for what I was envisioning for Libby's room.
Though the tutorial was GREAT for how to apply the foam/fabric, etc., it didn't say anything about actually constructing the board itself. I decided that I wasn't going to spend the extra $ for a contractor to do something I could do myself. That's not to say that it's perfect but I had fun doing it and learned a lot along the way.
So here's how to go from this:
To this:

You'll need a circular saw, jig saw, handsaw (maybe), utility knife (box knife), MDF board, high density foam, quilt batting, and flat joint plates.

And don't forget to wear your safety googles:

Notice the glisten of sweat on my skin. I'm doing this working in our garage in 108 degree heat!

I based the shape of my headboard on the template found HERE and just adjusted the measurements as needed to fit the dimensions I wanted.
Once I got everything calculated I used a sharpie to draw the outline onto the MDF board:

Because my headboard was going to be super tall I needed to use 2 boards of MDF (~2 inches thick) so I had to use metal joints to fuse the seam b/w the 2 boards. I screwed in 4 plates on each side of the headboard in opposing spaces to make sure that it wouldn't bend at the middle:

After I cut out the shape of the board and screwed in the plates I then followed the tutorial found on the site mentioned above to apply the fabrication to the board. I ordered 2 inch thick high density foam online that was 52 inches wide and 108 inches long. I had to use 2 rolls to cover the board. Total cost for the foam was around $50.00. The fabric I had on hand. I bought it for $6.49 a year ago at a fabric store on sale! The quilt batting is $7.00/bag and I used 2 bags. The MDF board is around $27.00/board and I used 2 boards. The metal plates are $2.25 each bag and I bought 2 bags.

Because the MDF is very easy to break you have to be VERY careful when you're moving the headboard. I found this out AFTER I broke off both legs. Luckily I had already applied the fabric and batting so they were just dangling there. I just quickly cut some pieces of wood and screwed them into the MDF to give the legs support.

The headboard isn't meant to stand on it's own. You hang it with a long metal hanger thingy that you will see on the tutorial on Design Sponge. It worked out great and I measured it so that it looks as though the headboard is free standing.
I'll post more photos of the finished product once I get Libby's room looking the way I envision it in my head.


Comments