Some new blog designs and a tutorial on how to add a personalized signature to your blog posts...
Here are some new blog designs I've done recently.
Lindsey had already picked out a background she loved so we used that to build the rest of the blog. That and her Seussical title for the blog lead me in a fun and funky direction. I think it turned out super cute and fun. Just click on the button below to be redirected to her blog:

Stina and Jay are soon to be adoptive parents. Stina had also already picked out a background she found and wanted to go with that look so I just edited the image and added some fun elements. Click on the button below to see their new blog:

Both of these ladies were super easy to work for and I had a great time collaborating!
Aside from the new blog designs I also wanted to do a quick tutorial
on how to add a signature/post divider to your posts.
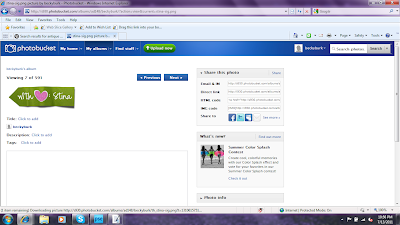
The first thing that you'll need is an image. Whether you want just your name or a dotted line or a scrapbooking element you'll need to save that image to some sort of photobucket, flicker, shutterfly, etc. account. You'll need the "direct link" from that image to plug into the code below. It will look like this:

(you see the links and codes to the right of the image... you'll need to copy the entire url for the code listed under "direct link")
Once you have that url you plug it into this HTML code: (DON'T LEAVE OUR ANY . OR , OR " AT ALL, EVEN THE ONES IN THE PARENTHESES)
.post-footer-line-1{background:url("PASTE YOUR URL HERE");
background-repeat: no-repeat;
margin: 0px 0px 0px 0px;
padding: 120px 0px 0px 0px;
margin-bottom: 3.5em;
font-family: 'Trebuchet MS', Tahoma, Arial;
}
Now that you have your code just copy it then go to your blogs "design" tab and click on "edit HTML". You'll see that it gives you a LONG list of gobbeldy gook in the left side of the page with a little bar to scroll through. You'll want to scrool about half way through the code in most cases and look for this:
/* Footer
----------------------------------------------- */
Each section of your blog will be broken down in this way. You'll see seperators just like labeling each section of your blog ie. Posts, Headers, Widgets in the place where you see "Footer" above. The "Footer" section comes directly after the "Post" section. You want to paste your code right above what I've pasted above. It should be the last line of code in the post section right above the footer section.
***IMPORTANT***
Before you click save or anything like that, PREVIEW your changes. It will open up your blog in another window so you can see if you like the signature or if it's too big/too small. If you like what you see then click "save changes".
This is really the easiest way that I've found to add a signature to your blog and even though the idea of messing with HTML scared me to death when I first started blogging it's really very easy and when you do it once you'll feel like a pro!
If you want to either increase or decrease the space b/w the signature and the "comments" section change the "padding: 120px" in the code I've provided. A smaller number ex. 80px, means it will be closer and a larger number ex. 150px will spread it apart.
Don't change any other numbers except for the 120.
If you have any questions about this tutorial at all just shoot me an e-mail or comment and I'll try to help you out.
Lindsey had already picked out a background she loved so we used that to build the rest of the blog. That and her Seussical title for the blog lead me in a fun and funky direction. I think it turned out super cute and fun. Just click on the button below to be redirected to her blog:

Stina and Jay are soon to be adoptive parents. Stina had also already picked out a background she found and wanted to go with that look so I just edited the image and added some fun elements. Click on the button below to see their new blog:

Both of these ladies were super easy to work for and I had a great time collaborating!
Aside from the new blog designs I also wanted to do a quick tutorial
on how to add a signature/post divider to your posts.
The first thing that you'll need is an image. Whether you want just your name or a dotted line or a scrapbooking element you'll need to save that image to some sort of photobucket, flicker, shutterfly, etc. account. You'll need the "direct link" from that image to plug into the code below. It will look like this:

(you see the links and codes to the right of the image... you'll need to copy the entire url for the code listed under "direct link")
Once you have that url you plug it into this HTML code: (DON'T LEAVE OUR ANY . OR , OR " AT ALL, EVEN THE ONES IN THE PARENTHESES)
.post-footer-line-1{background:url("PASTE YOUR URL HERE");
background-repeat: no-repeat;
margin: 0px 0px 0px 0px;
padding: 120px 0px 0px 0px;
margin-bottom: 3.5em;
font-family: 'Trebuchet MS', Tahoma, Arial;
}
Now that you have your code just copy it then go to your blogs "design" tab and click on "edit HTML". You'll see that it gives you a LONG list of gobbeldy gook in the left side of the page with a little bar to scroll through. You'll want to scrool about half way through the code in most cases and look for this:
/* Footer
----------------------------------------------- */
Each section of your blog will be broken down in this way. You'll see seperators just like labeling each section of your blog ie. Posts, Headers, Widgets in the place where you see "Footer" above. The "Footer" section comes directly after the "Post" section. You want to paste your code right above what I've pasted above. It should be the last line of code in the post section right above the footer section.
***IMPORTANT***
Before you click save or anything like that, PREVIEW your changes. It will open up your blog in another window so you can see if you like the signature or if it's too big/too small. If you like what you see then click "save changes".
This is really the easiest way that I've found to add a signature to your blog and even though the idea of messing with HTML scared me to death when I first started blogging it's really very easy and when you do it once you'll feel like a pro!
If you want to either increase or decrease the space b/w the signature and the "comments" section change the "padding: 120px" in the code I've provided. A smaller number ex. 80px, means it will be closer and a larger number ex. 150px will spread it apart.
Don't change any other numbers except for the 120.
If you have any questions about this tutorial at all just shoot me an e-mail or comment and I'll try to help you out.


Comments